We learned quickly that Bottled water is an unwanted and expensive chore.
We are water bigots and at home drink RO (Reverse Osmosis) or bottled water to get rid of chlorine or other chemicals
But then we realized we already have double filtration in the the RV (house filter + external hose mounted filter) so pouring everything through the Brita gives us a third stage filter.
US water is already pretty good. The water from the RV water tank tasted great from the pitcher after being triple filtered and nobody died.
Previously we traveled with multiple gallons of bottled water and were constantly restocking so this little Brita Pitcher really simplified things.
We ended up unloading about 20 lbs of water we normally carried and just rely on the RV fresh water tank.
Ok this is an absurdly simple item, hardly even worth mentioning…
I learned of it while watching the YouTube channel “HoboTech”. This chronicles some middle age guy who gives up his dayjob, converts an old RoadTrek, and travels the country.
In between, he offers a lot of great tips for the DIYer.
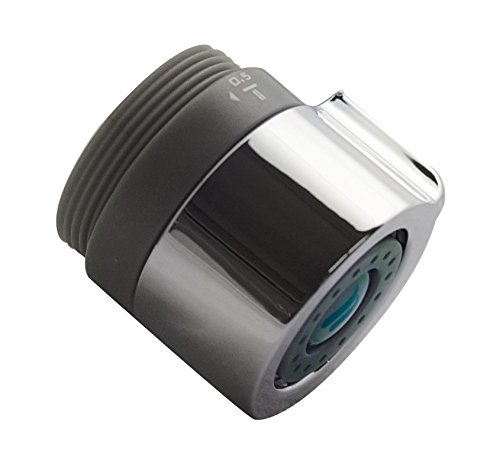
So one of his recommendations was this little aerator for your kitchen faucet. You rotate it through 3 clicks to choose the amount of water.
The default setting for me of .5 gallons a minute saves a lot of water and gives a nice aerated stream instead of the normal faucet which comes out more like a hose.
I suppose the downside is – if you wanted to fill a water jug or something it’s completely useless, you would literally need a funnel. But we don’t drink from the house water supply, so this little thing is perfect for us.
UPDATE 21-Feb-2021 The Cradlepoint worked well but I put in a new router and antenna. This article is still mostly relevant for drilling the roof and installing in general.
We travel in our RV to get away from the city, and enjoy remote places. That said, I have a job, and I need to be in contact in case of emergencies. Having Internet everywhere enables me to travel more than I otherwise could enjoy.
So as much as possible, I want Internet everywhere. I even have a satellite phone onboard. Its not a good solution though. The costs are horrendous and the data rate is something like 59kb. You can send a few messages if you are lucky, or read an email. That’s about it.
So first I tried the weboost experiment, and it didn’t really pan out for me.
It boosted the signal all right, but did not result in a usable increase in data bandwidth. I might never have realized this, but when I tried to measure the performance of various antenna alternatives I discovered none of them seemed to do much for me, unless you count the joy of having more “bars” (while actually still having no signal).
It seems to me that the weBoost works strongest for voice and maybe 3G signals, which end this year anyway. Although there are a lot of claims of increased LTE performance too, I was not able to replicate that. (Its possible that with the large “OTR” antenna mounted high up I might have had somewhat better results.)
I really need to have Internet when I travel, so on to plan “B”.
I started experimenting with “Mimo” antennas, which is simply an external LTE pair of antennas that you connect to a router or a hotspot.
I started with a Verizon 7730 hotspot which I already had, and an LTE antenna by AntennasPlus.
That seems to work a little. I got some dramatic increase in UPLOAD speed in a rural area, which can be useful, because if you can’t send anything you can’t receive either.
Still I wanted more.
I wanted the mother of all RV Internet. Most of the serious technical discussions on the internet center around using a router and an external antenna.
So with a gasp I ordered the Cradlepoint IBR900, a dual sim mobile LTE router which sells for a whopping $850 on Amazon. (Sounds high, but hey, my phone costs that much)
Next I outfitted it with both Verizon “unlimited” and AT&T “unlimited” sims. There are going to be places that only have one or the other.
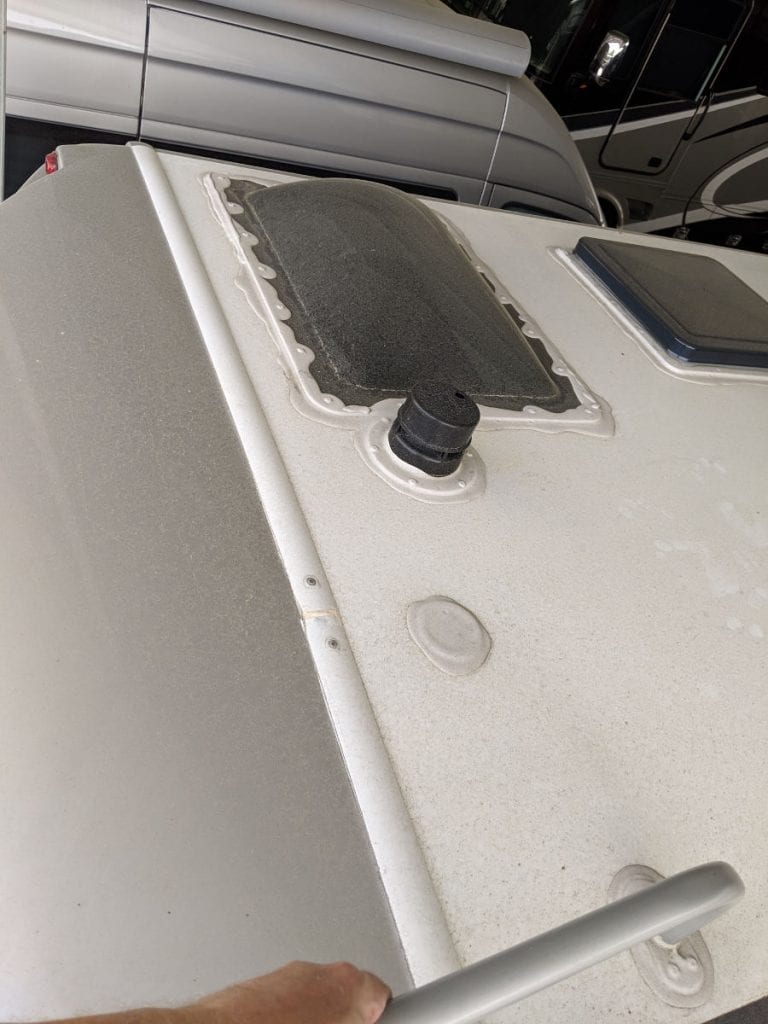
And finally the MobileMark roof antenna. I opted to get the magnetic version (that goes on a steel disk) as its easier to replace and I want to share the hole I’ll have to drill with a Sirius antenna.
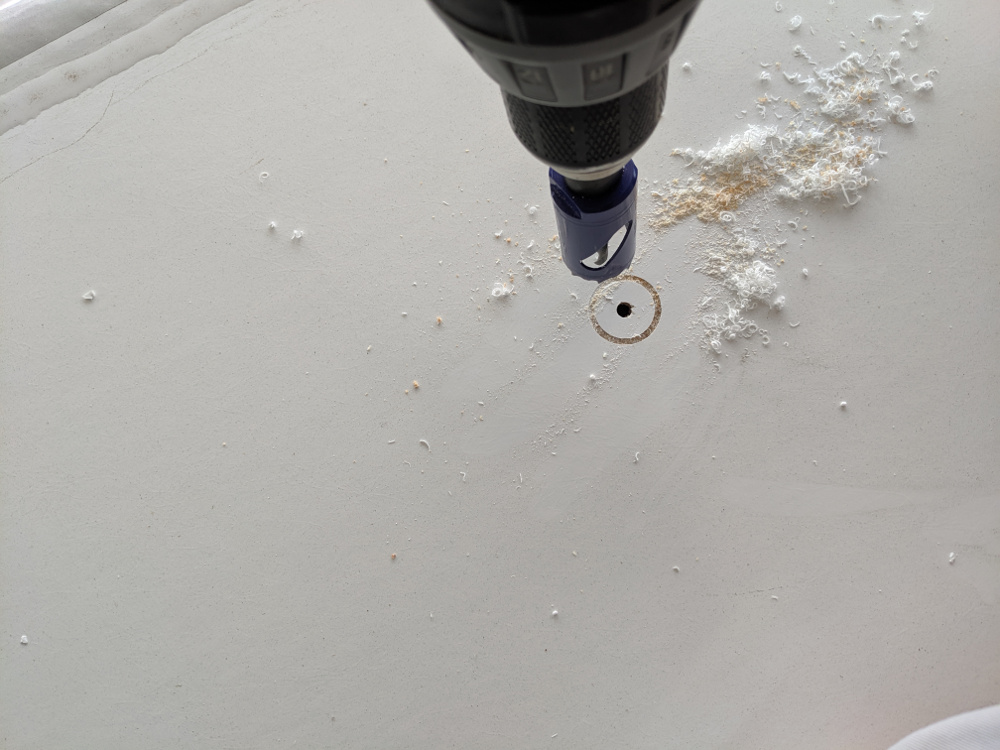
It turns out the roof drilling part was not as scary as it seems. I just cut a little hole in the ceiling with a knife, and started drilling with a 1 1/8″ bit. The reason for the large hole was to shove a 1″PVC pipe down the hole. I started upwards from inside as I wanted that precise but did not care if I was an inch or so off on the roof.
One the leader drill went through, I finished topside. The actual final drilling was a piece of cake:
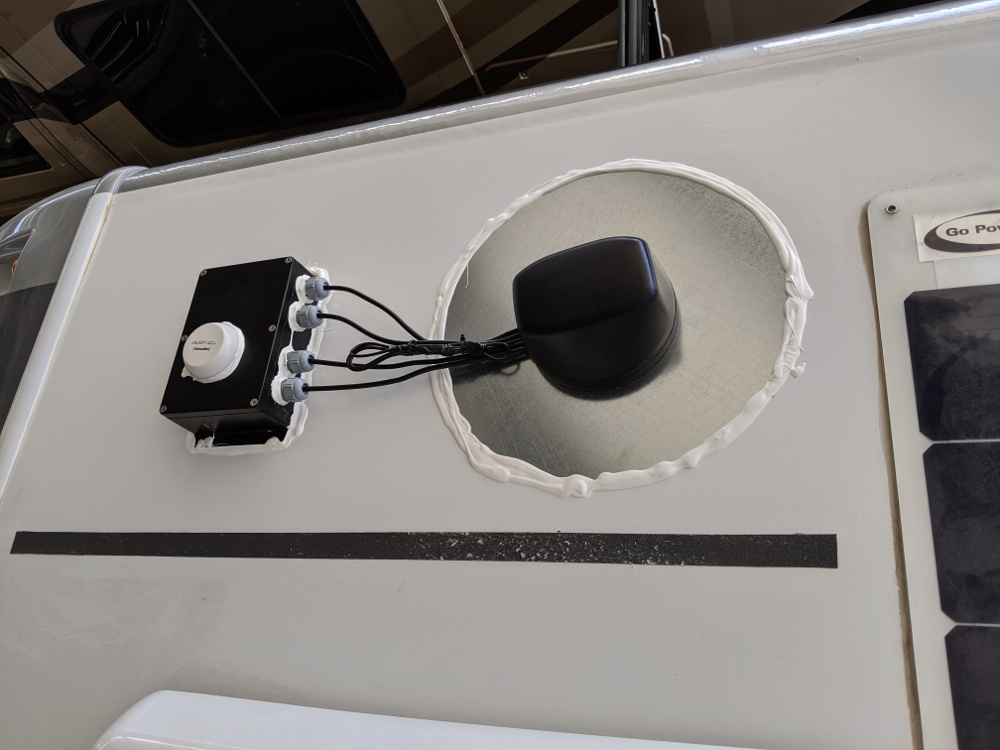
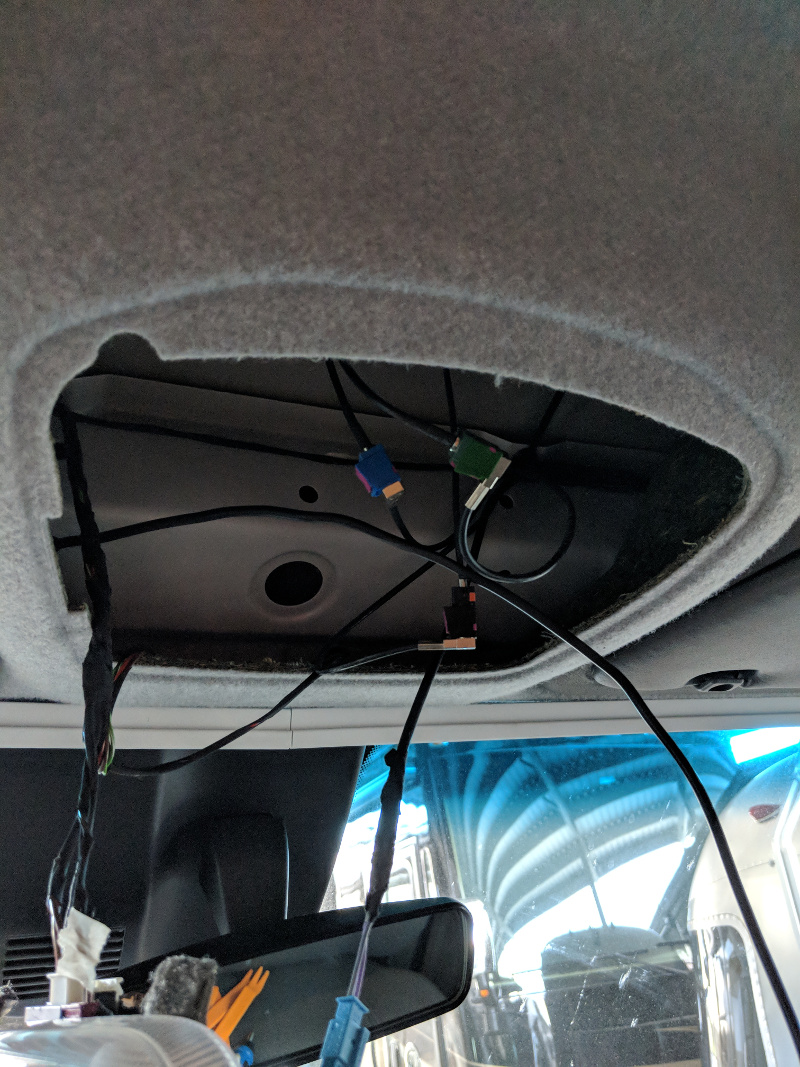
Here is a completed view of the whole project:
I would like to find some sort of grommet or something for the inside hole, which is drilled in my entertainment center above the TV. You can’t see the hole unless you stick your head in the cabinet and look up. But since its a standard 1″ PVC pipe I should be able to find something to make it look finished:
What I ended up doing was, using a very high quality Bud Industries aluminum powder coated box. I used cable glands by McMaster-Carr.
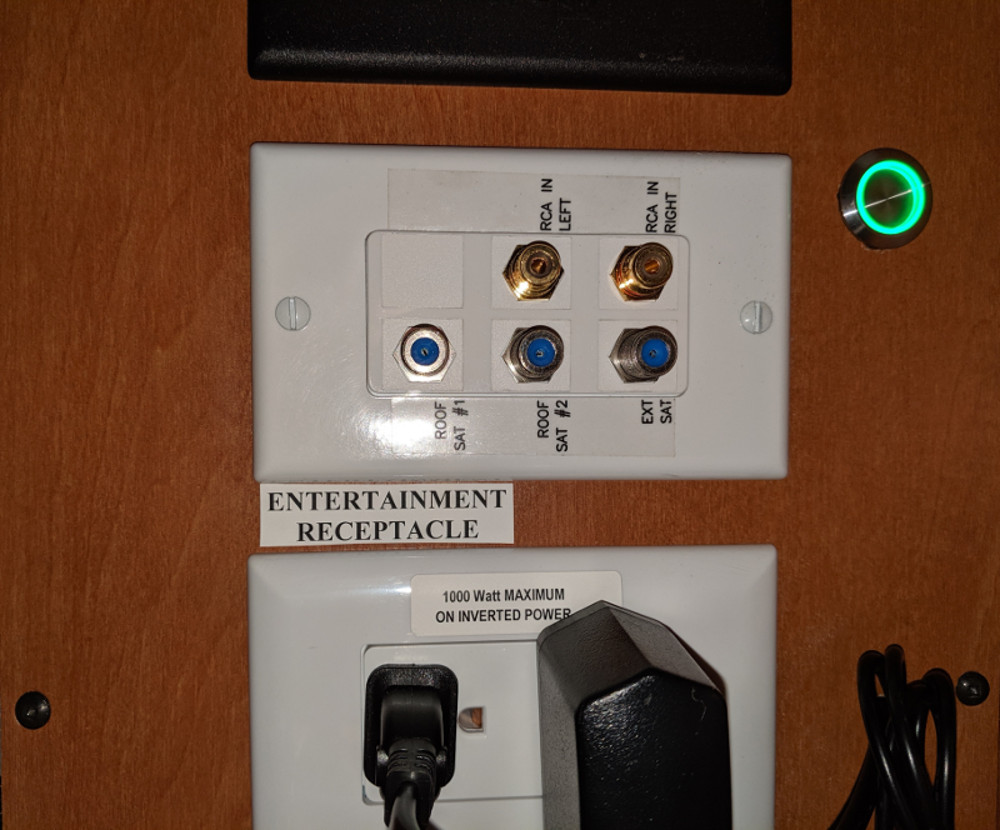
The router is housed in my entertainment compartment on top of the BluRay. I mounted a little lighted switch and pigtailed it off the 12 volt wiring for the Winegard 2.0 which I have never used and am not very likely to now. The green button switch below quickly tells me the Internet is “on”.
As a side project I mounted a marine Sirius antenna on the box for my Pioneer dash radio I previously installed. Finally I purchased a galvanized 13″ metal disk off ebay.
The box is secured by VHB tape. The disk is secured by nothing – just a bead of Dicor. Folks say that’s all that is needed – we’ll see!
So far I am pleased with the results. Note that a lot of the time, I don’t get much better reception than a top quality phone. That is somewhat expected. I am taking a cross country trip in a month which will allow me to really test it better in poor signal conditions.
So far in a couple of semi-rural areas I got better bandwidth than my phone in areas with crappy signal, as measured by the speedtest.net app.
The cradlepoint router is definitely not for the tech-scared. Its cumbersome to set up, although not a lot worse than older home routers. The dual sim feature will enable me to switch to AT&T if Verizon is a no-go. That takes a LONG time to switch – like several minutes – but is fine for my application.
The small wire bundle in the picture is because I decided not to connect the gps cable since I have no real use for it.
Here are a couple tips I added after having this for a month. First, every time you open the sim tray you risk losing the tiny screws. I would suggest surgical garb and a clean room. If you do loose one, there is a replacement bag of 2 buried in the bottom of the box that you would never find unless you read this article.
Second, I spent 2 days in network hell with mine watching it randomly crash after a while.
Eventually I realized it only happened on AT&T, and a call to tech support got it fixed. Turns out there is a known firmware bug – just turn off carrier aggregation, which is under advanced setting in the modem setup.
One of the reasons I purchased at 5GStore besides the fantastic customer service is they agreed to have the antenna custom made with shorter 3 foot cables. That eliminated a lot of clutter and there is a slight signal gain in making the leads as short as possible.
The cable glands I used are: McMaster-Carr PG-11 Cable glands They require a PG-11 hole, which is what the greenlee punch above is for. It cut through the aluminum like butter.
I slobbered Dicor over everything and declared victory. Note that I am no genius, and just copy what other folks have done. This project is based on ideas from a bunch of sources on the internet.
Sooner or later, if you have an RV, you are going to discover that some of the nicest places you would want to camp don’t have any cell service. None. Nada.
Now, some people might think that’s just fine. But I have a job, and can take emergency calls round the clock, even on vacation. Its rare but it has happened, and I need to be available.
There is also the safety factor. I’d hate to wake up clutching my chest and realize nobody can dial 911.
RV Internet seems fragmented into two camps of dogma. One group says you need to get a “MIMO” antenna, mount it on your roof, and then plug into a device that supports – for example a Verizon hotspot.
Another camp suggests “cell boosters” which again, have an antenna on the roof, only they broadcast a weak signal inside and you can use your phone or a hotspot.
(Actually a third camp says 5G is coming and its all a waste, but last I checked, some remote areas are still running cell equipment a decade old so I’m not expecting 5G in the wilderness anytime soon)
I settled on trying out a cell phone booster first, as we have multiple devices (2 phones and a hotspot) and it would be much more convenient to be able to use them all.
So weboost (supposedly) is a cell service amplifier that will turn that half a bar service into something better.
For starters, I googled around and a few people posted about using the “satellite pre-wire” that my RV has. That sounded great! Just mount the antenna on the ladder, and connect up the inside unit, and I could finish the whole job on a saturday.
Unfortunately it was not to be so….
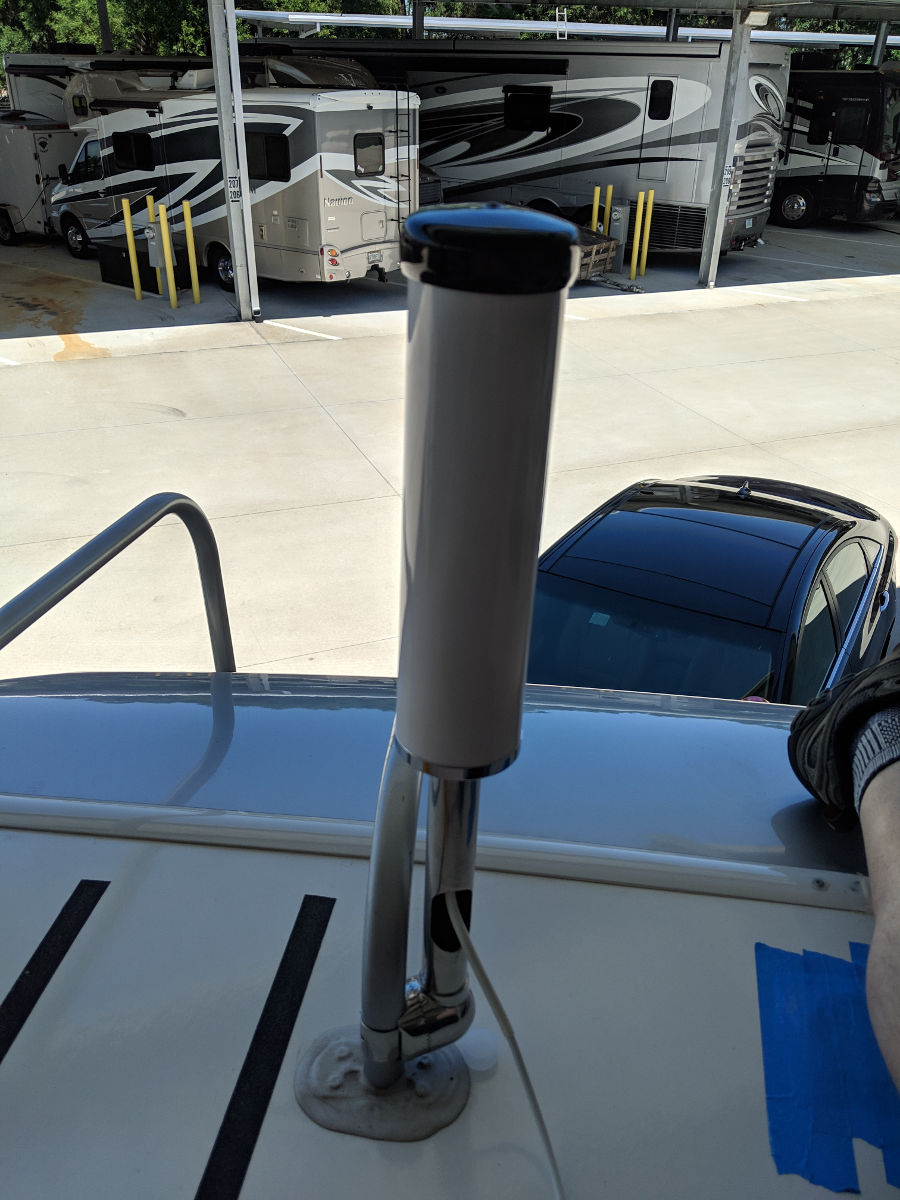
First I needed to mount the antenna, only the provided clamps that come with the RV antenna are really junk. Plated steel C clamps. They look like the kind of thing suitable for a doghouse or a flagpole – and I have neither.
In addition, they don’t fit my ladder, and even if they did, they would scratch it up terribly besides ruining the appearance.
So for my initial testing, I just stuck the antenna on a cardboard box and placed it on the roof so I can measure how great this thing worked.
Next, my RV has a satellite pre-wire here:
I’m standing on the ladder in that picture and that little round plate covers the hole. So I just scraped off the dicor, popped out the plate, and connected the coax cable there to my temporary cardboard box mounted antenna.
Then back inside the RV, hook everything up, and connect the weboost to the satellite pre-wire coax plate using an adapter.
Then I powered on the weboost. I have read in numerous places that you need to place the phone literally an inch or less from the inside antenna. So I conducted speed tests with the weboost both on and off and…
Surprise! With the weboost powered on my speed dropped from about 10 Mbps to 5 Mbps, a 50% decrease. On a bright side, the phone showed a substantial increase in cell phone signal or db or “bars” as its commonly known, but what good is that if your speed is effectively 50% of what it used to be.
Well that doesn’t seem right, but I had two possible explanations. The first was you really are not supposed to hook it up to some random coax cable, but use the provided one.
And the second is that who cares how this thing works in a decent signal area. Maybe I would get better results in the wild boonies, where it matters?
So first I set about testing the pre-wire cable. It did seem that using the included cable produced a much higher cell signal, but again, it did not translate to any speed improvement and in fact it was still 50% worse than with the weboost turned off.
So back to the drawing board. I decided to buy the pricey marine antenna, because you can buy many different nicer stainless steel rail mounts. I guess weboost assumes people that have yachts take more pride in what their antennas look like.
So back to the RV, now it looks like this:
Thats my leg sitting on my roof, with temporary painters tape over the hole. I’m assuming now I’m going to have to drill a new hole in my roof so I can use the correct cable, but that will only come later if I can prove this really works.
At least this antenna looks great! That’s part of my theory on installing stuff. Make it look great first and then get it working.
Unfortunately the results were even worse that before. Some signal increase (way less than the RV antenna though) and a 50% reduction in throughput.
At this point I called weboost tech support who were remarkably available and friendly. They agreed it didn’t seem logical that the marine antenna was worse than the cheaper RV antenna, so they sent me a new one, no questions asked. Very impressed by that, anyway.
One thing that did bother me about weBoost support – he kept saying I should measure the signal db (I already had) and verify it was “boosted” (it was) but didn’t really respond to my complaint about the speed being worse except to say that shouldn’t happen.
So I received that new antenna today, about a week later.
My plan on Sunday is to drive 3 hours to a rural state park in Florida, where I can test the weboost in real world conditions in a location that has barely any cell service. If it seems to work at all I am then going to methodically speed test 4 possible antenna hookups:
New marine antenna (also came with new wire)
Old marine antenna and wire
RV antenna and wire
RV antenna and factory pre-wire ( I can’t test the marine antenna with this as it uses a different connector)
I’m crossing my fingers, and hoping that one of those combinations will produce some decent speeds before going any further.
Update: April 25, 2019
Well, I took an entire day for a round trip to drive to Manatee Springs State Park. This is the infamous state park in Florida that has NO Verizon signal most of the time, but not so far from town that it would seem hopeless.
Pulling into the park I had high hopes, but I regret to say that the weboost didn’t work at all. Sure, it raised my signal db and “bars” by a whole bunch, but my phone was still incapable of transmitting or receiving any data. I tried all 3 of my antennas.
Unfortunately I didn’t think to test voice or text – there could have been some improvement there, and that would still make the weboost useful, so I will test that in the future.
Why so many positive weboost reviews? I can’t figure it out. But so far for me I am not seeing any data boost anywhere I go.
Maybe its like vitamins. Almost every study has shown that the vast majority are of no value, and yet the majority of people think they do something good?
In the meantime on to plan “B”. I ordered a MiMo rooftop antenna and will text what effect that has on my Verizon 7730L hotspot.
Update: June 22, 2019:
The Mimo/Hotspot worked out better than the weboost so I decied to go all the way with “The Mother of All Internet“.
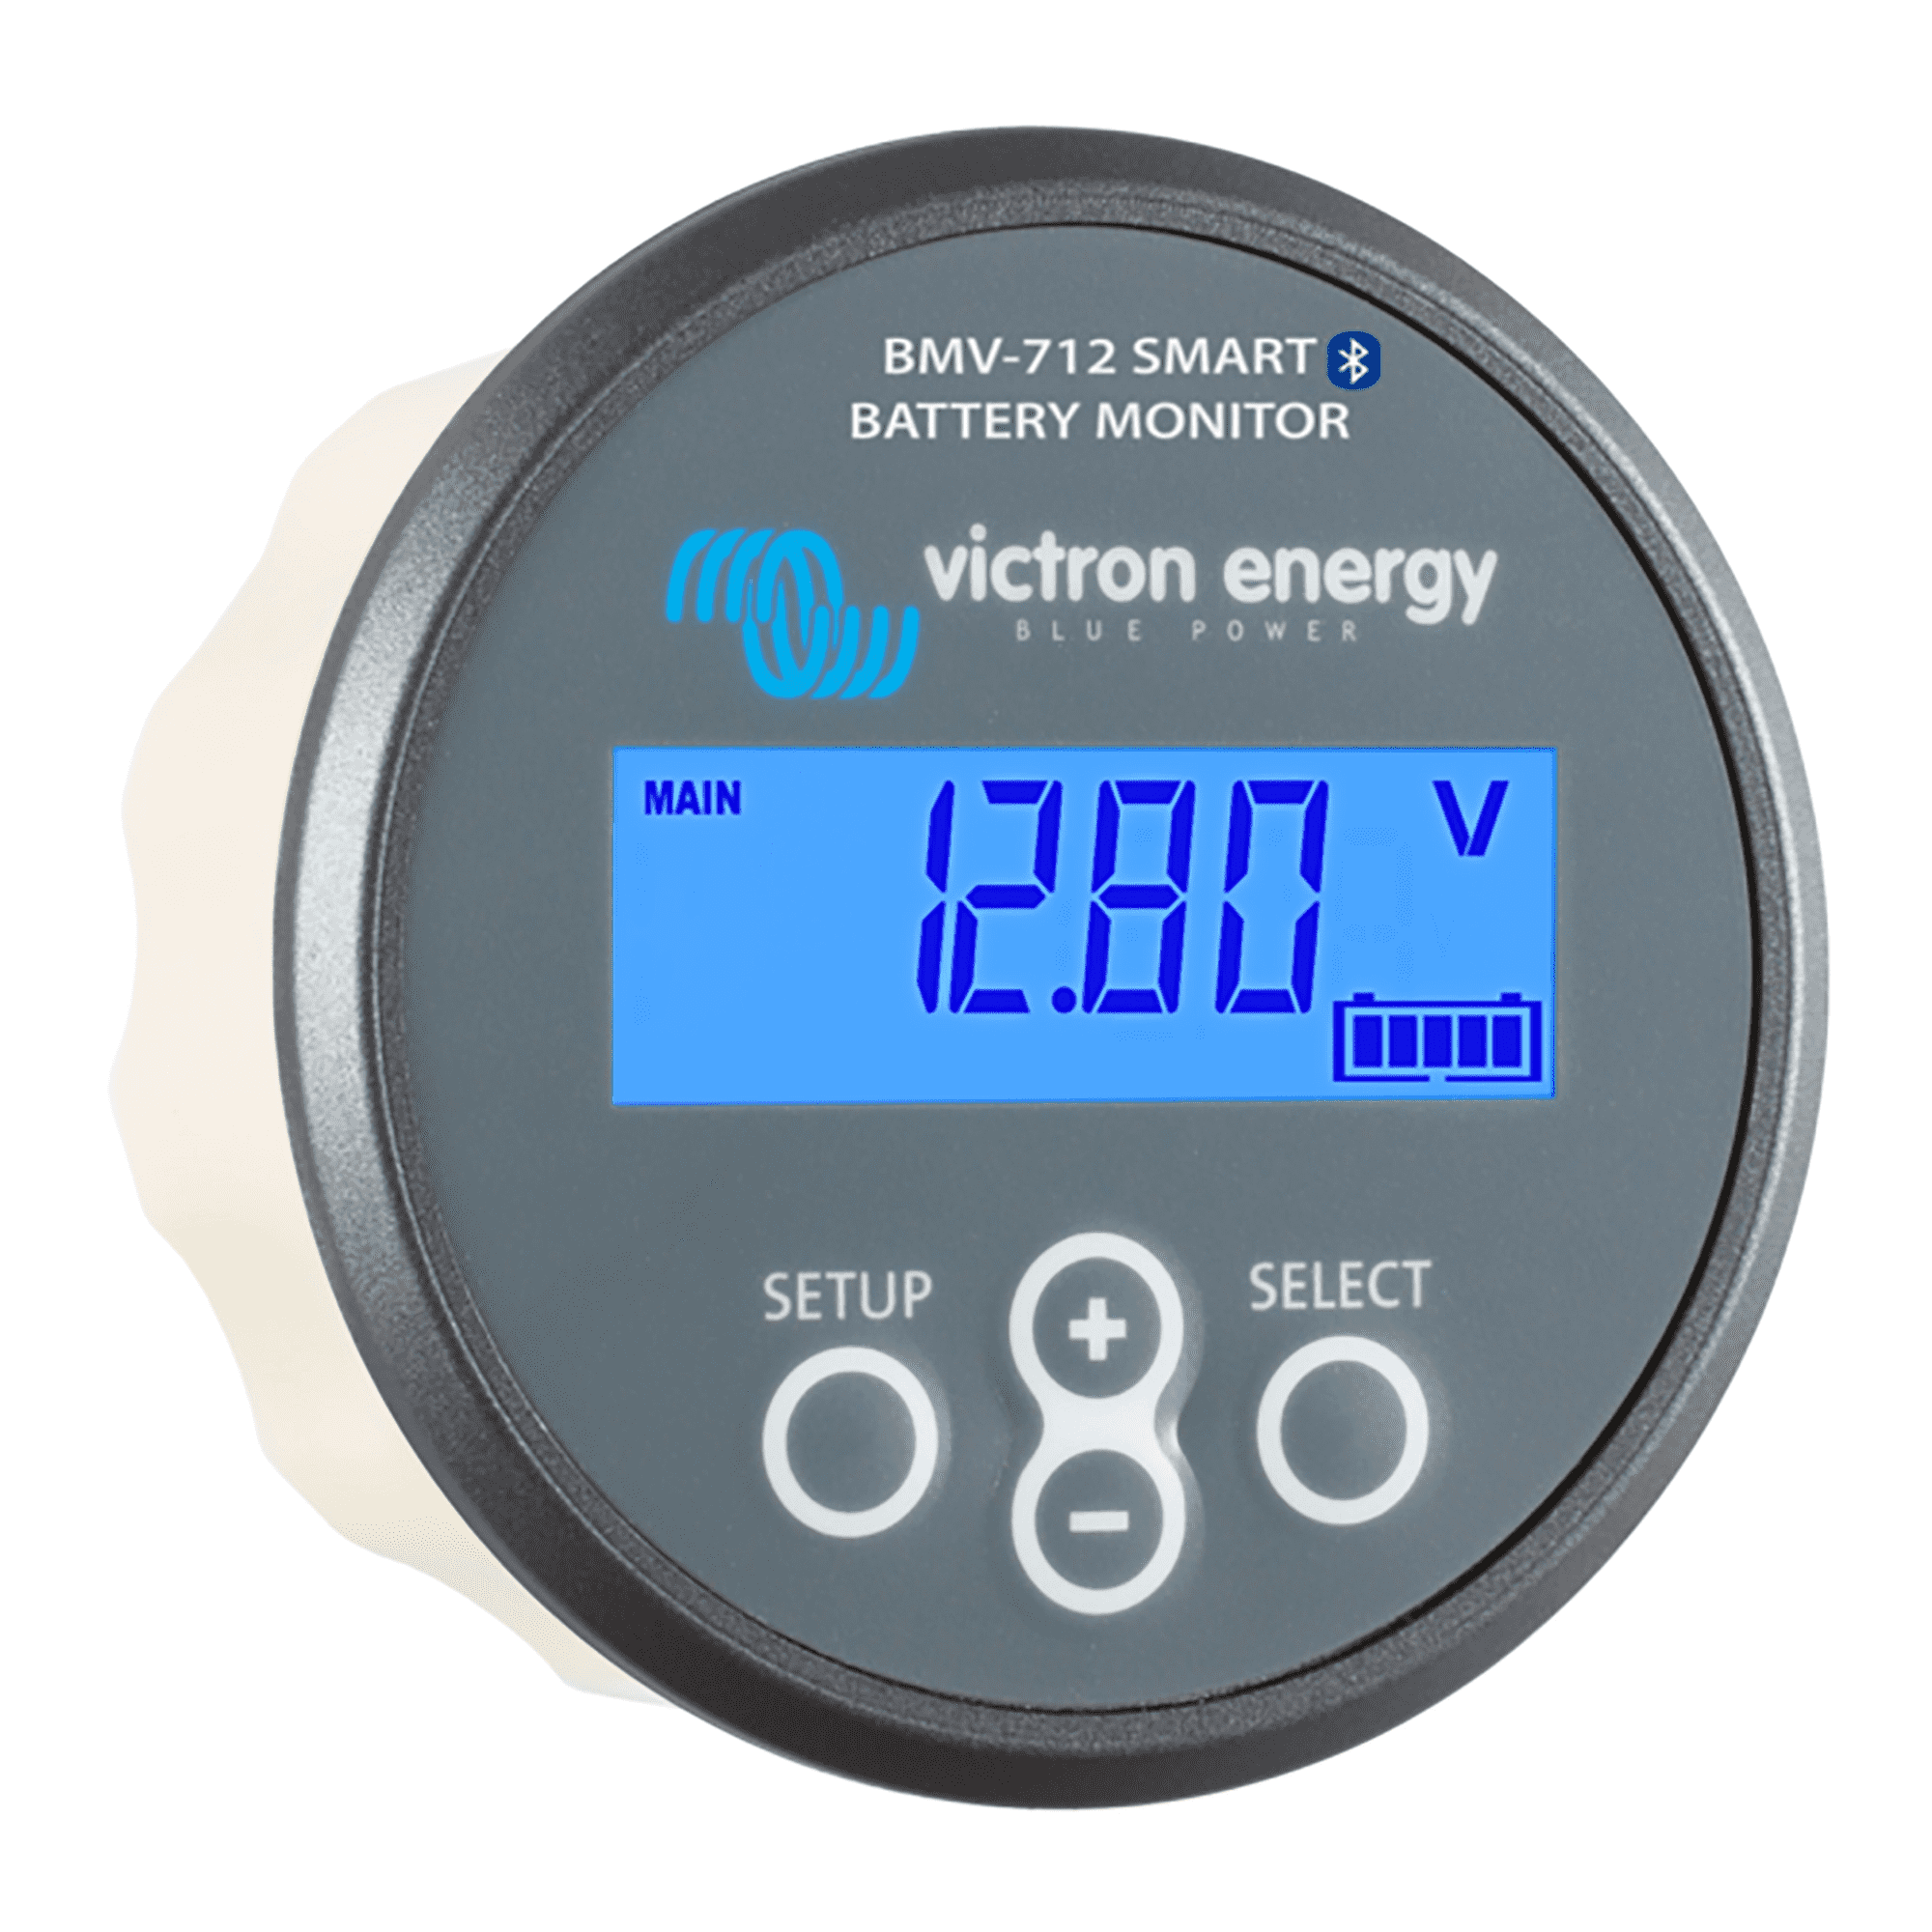
Note: This is an older post. I’ve upgraded everything since then. Nowadays you also have the choice of a smart shunt from Victron with no display. While that might be tempting because the Bluetooth app is way more convenient, reports are that a very short range Bluetooth is used on the smart shunt, so I’m glad I got the display. The new mounting location is shown in my Xantrex / Renogy post.
This weekend, we finally will be taking a short trip where we will be “off the grid” for a few days. This is partly by design – in Florida you cannot really sleep in an RV in the summer without AC!
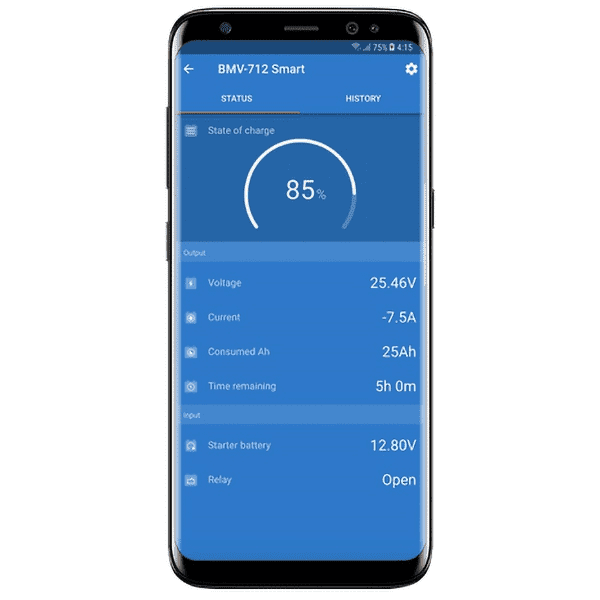
So it occurred to me, that we will have literally no clue how the coach battery is holding up. Sure, there is a rudimentary voltage reading onboard, but that is not really useful for knowing the batteries state of charge.
Among other things, if we have some sun on the roof and the solar charging, the voltage reading may look just fine until the sun goes down and reveals a dead battery.
So, off to install the Victron BMV-712. This works by installing a shunt on the native battery terminal, enabling it to read the amps coming and going, and by knowing the size of your batteries in amp-hours, the state of charge,
More importantly than the voltage, which I already know, the Victron will also show you a whole bunch of other info, either on the gauge above, or conveniently via bluetooth on your phone:
So, since I am anxious to take off, and running a remote cable from the battery box to the meter will take some serious thought, I did what most people do and just stuffed the meter in the battery box. I’ll mount it someday, but for now it means I can finish the whole job in a couple hours and use the app via bluetooth.
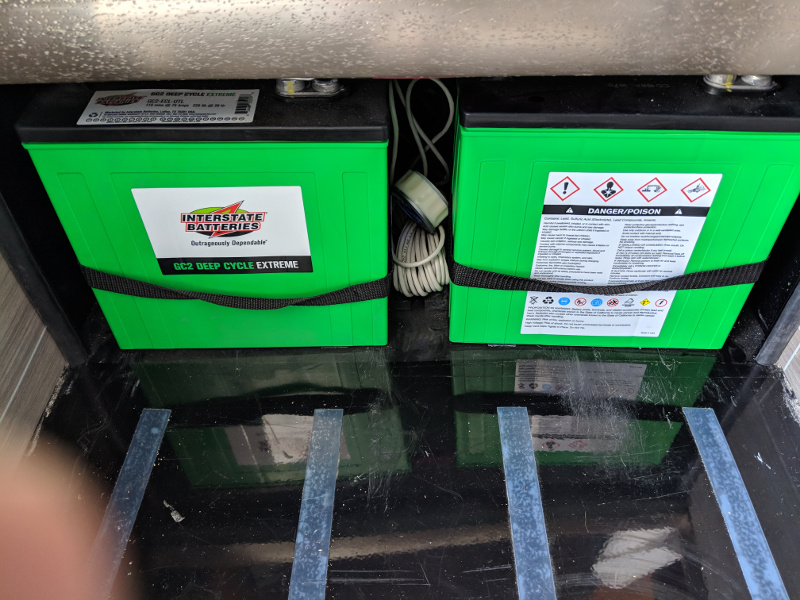
For starters the LTV has 2 6 volt “flooded” batteries (yuck) wired in series. So you think of the pair as one functional 12 volt battery. The shunt included with the BMV-712 has to be wired to the negative of the battery.
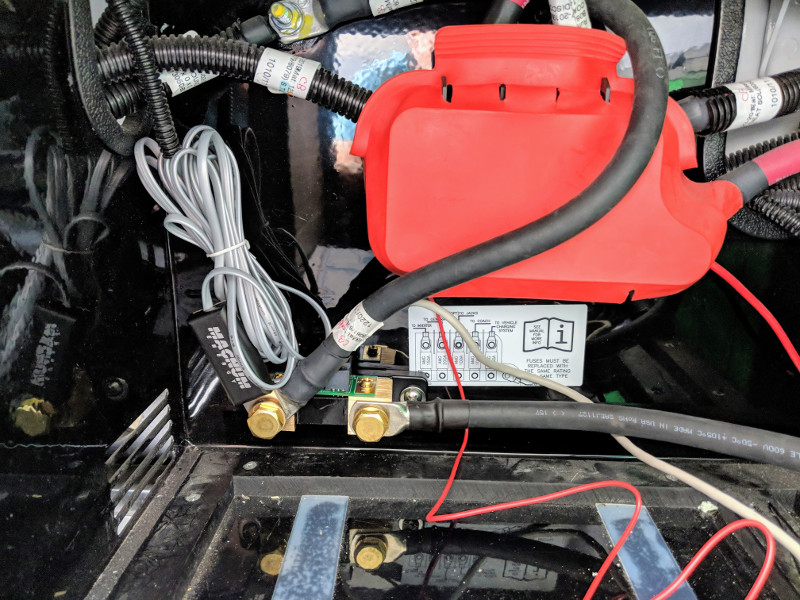
The first thing I discovered after sliding the batteries out of the box and removing the cables – there is practically no room to mount the shunt anywhere! Initially I thought I would mount on the side of the box – but since I want to upgrade to Lithium someday, and they are a little wider than the standard batteries, I decided to mount it on the rear with some sheet metal screws:
You can see the shunt in the bottom left. The left side gets what used to be connected the battery negative (Ground + the Magnum cable) and the right side gets a brand new cable which goes to the battery.
Edit: (Sept 7 2019) I later learned the “Magnum Cable” is actually the Battery Temperature Sensor for the Magnum Inverter/Charger. It probably really should stay on the battery terminal, as its senses a rise in temperature! Moot point now, as I removed it to install the Battleborn Lithium batteries which don’t use it since they have a built in bms (battery management system).
Thats it, only there was a bit of a curveball. Those original connections had too small of a ring to fit on the Victon shunt (which is 3/8″), so I had to widen them slightly with a rat tail file and a drill.
The stock batteries are 5/16″ posts, so I ordered a cable off Amazon that is 5/16″ on one side and 3/8″ on the other. That will fit exactly with no alterations. I ordered 2 feet which was overkill. The 2/0 Welding cable I bought is quite flexible, and the extra length makes it super easy to slide the batteries out for watering.
When slid back in, it looks like this. I just dumped the meter in between for now until I can mount it someday.
When I slid the batteries back, they barely fit. I think the rear of the battery is pressing against the cables attached to the shunt behind it. Its not too bad, and the Lithium batteries I plan to install lalter are a bit thinner in depth anyway.
The Victon app was nice and simple. It updated the firmware in the meter, and pretty much configured itself. I went into the settings and most of them were right on. I think I put in my battery amp-hours capacity (225) and not much else.
Here is the parts list. Note on Amazon I had to buy 2 cables (they are sold as a pair) but I think the extra may come in handy when I finally get around to installing the Lithium batteries.
DEC 2022 Update: The Pioneer worked pretty well but after 4 years I replaced with an Alpine Halo 11 iLXF511. This article is still relevant for some installation issues but the Alpine was much easier to install – basically plug-and-play since Critchfield offers a custom wiring harness. Times have changed I never used the DVD or offline GPS; the Alpine has neither.
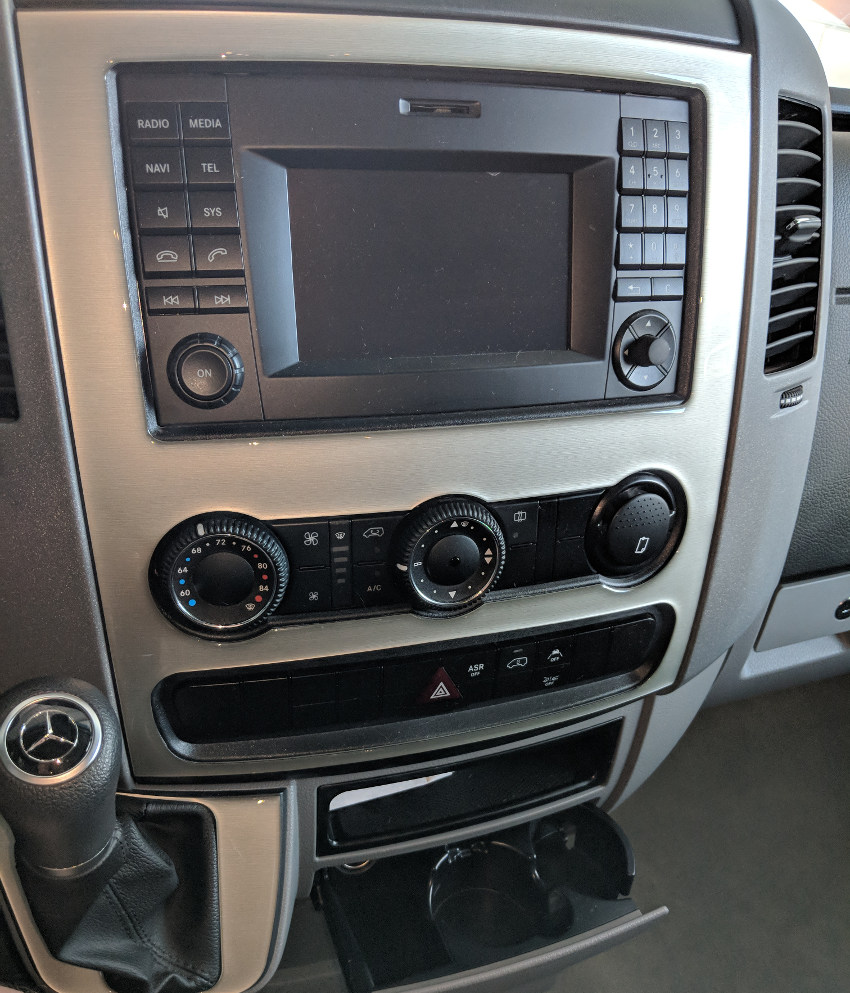
My Sprinter RV (2019 LTV Unity CB) came with a basic radio and Becker Map Pilot.
So to be honest, I only turned it on once. I’m a technology bigot, and as soon as I saw the decades old interface and the lack of any modern features I switched it back off. To be fair, I have heard it does work, and if you are just interested in getting from point A to point B, it will probably work for you.
I need something nicer, and most specifically it has to have wireless Android Auto. My Google Pixel 3 already supports this, but soon everything will. My wife has an iPhone so the Apple CarPlay is useful too.
But I’d also like to have the built-in GPS. I’ve always refused to install these in my auto, as the maps and features become stale and out-of-date as soon as you drive off the lot.
I figure an RV is a special use-case. Some of the time we’ll be completely out of range of a mobile signal. Sure, a great feature of Google maps is you can preload the map, but if you unexpectedly find yourself with zero bars the in-panel nav is nice in a pinch.
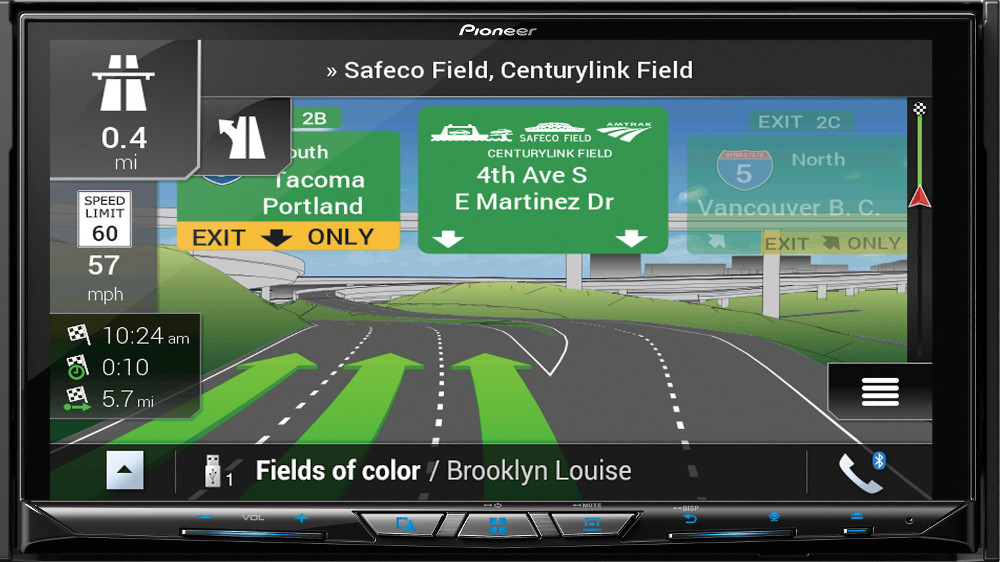
The unit I settled on after a lot of Internet research is the Pioneer AVIC-W8400NEX.
This seems like it will meet all my requirements. It has a few other features I like:
Optional Sirius integration
Capacitive Multipoint Motorized Touchscreen
Dvd player (movies and audio, wish it were Bluray)
Remote Control (I know i’ll probably never use it)
Supports 2 cameras, and a range of input and output including HDMI and RCA jacks
Older Pioneer units have been well reviewed (with a few hiccups naturally). Its pricey, at $1,000, and that’s before you buy all the needed accessories like wiring harnesses and the like (or pay for professional installation).
So I have decided to install this myself, which I realize will be a bit of an exercise in masochism. Crutchfield, which is kind of authority on stuff like this, told me that had no info or idea about this, which gives me some pause.
Still, there are some threads on the Internet about installing previous Pioneer’s in Sprinters, and I have no doubt I can make it work one way or another, so I am ready to take the plunge. I’m only a bit nervous because nothing on the Internet seems to have a complete step by step guide and no confirmation that it will work for 2018 Sprinter.
Here are some good links I found in my search, for starters.
One bummer I see right away in my research is that the iDataLink Maestro adapter will not work with Mercedes – meaning a whole screen full of cool real time sensor info can’t be displayed, but maybe someday…
So without further ado I am ordering this. Amazon, as usual, will have it in my greedy hands in 2 days. And they did.
As I mentioned one of the worries I had about this project was, the companies that make the adapters and wires say it doesn’t work on a 2018 Sprinter. But I think they just can’t be bothered to update their websites more than every couple years, so we shall see..
So for starters, here is what it looked like before:
2018 Factory Sprinter Radio w/ Becker
Thats a lot of buttons! I have to say, by the way, I just don’t understand why they build cars with hands-free speaker phones. Who would actually use these, unless you are driving by yourself? How revolting it must be for your passengers to have to hear both sides of a conversation while confined with you. But I digress…
So the first step is to pop that faceplate off with these nifty little orange panel pullers I got off Amazon. I just went slow and gentle and it was a piece of cake. A single wire connector at the bottom is unplugged next.
(It was around this moment that I remembered to first pop the vehicle ground from under the accelerator pedal, and you should too.)
After that, the radio is held in place with just 4 size 25 Torx screws.
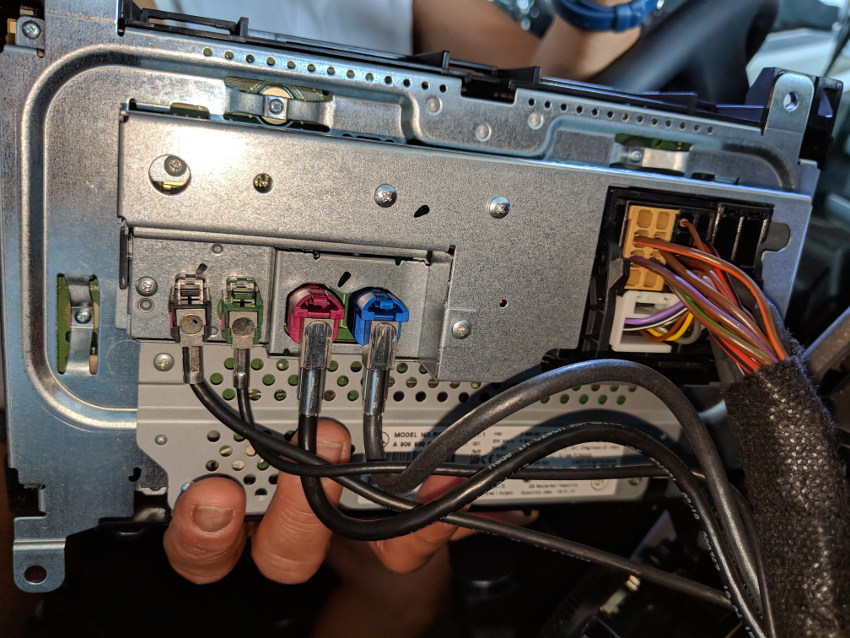
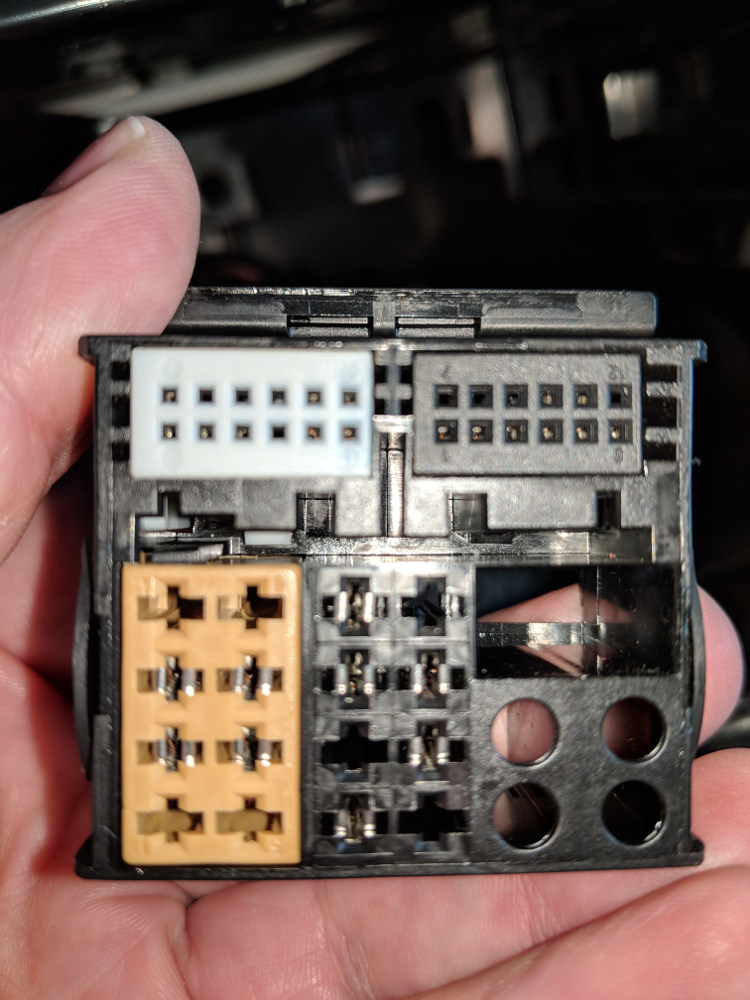
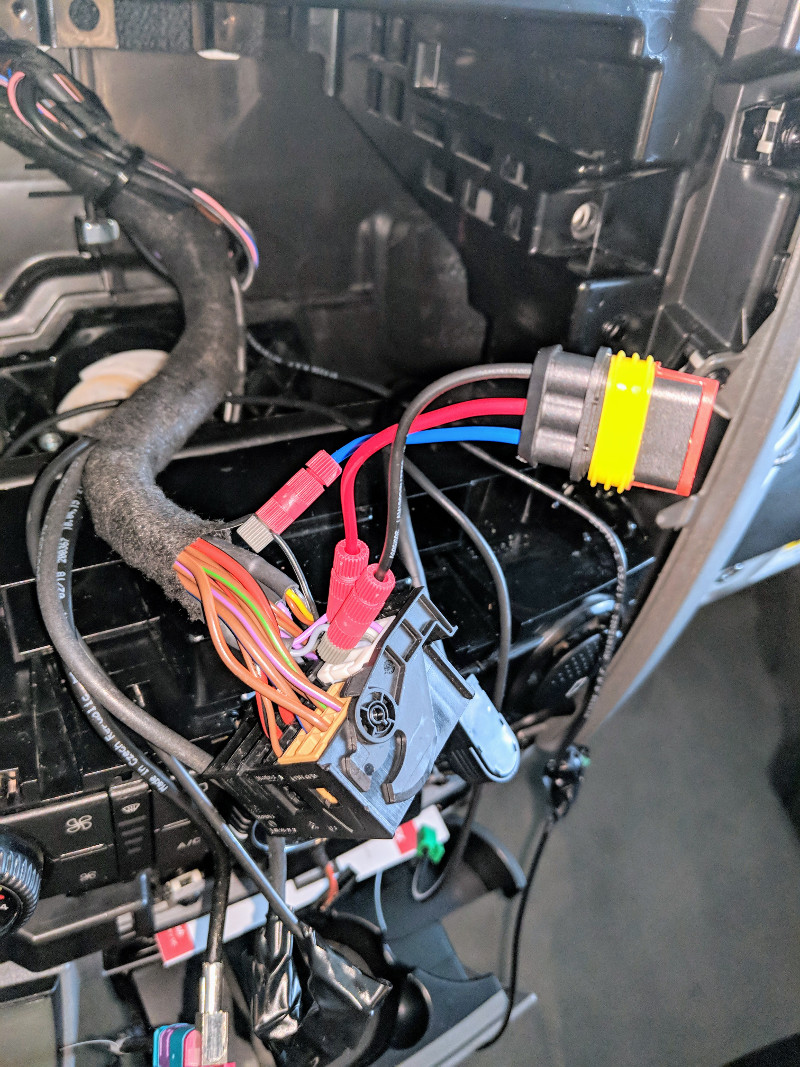
The back of the radio has 4 connectors for gps antenna, backup camera, etc, and a giant connector for everything else. There is a little locking connector on the later, after you squeeze the release you eject it by gently pulling the lever.
Interestingly, the aftermarket harness doesn’t use the entire top 2 rows of pins, which is the bulk of this plug. Presumably those pins include a bunch of stuff like the in-dash road name and direction display which I guess I’ll be losing.
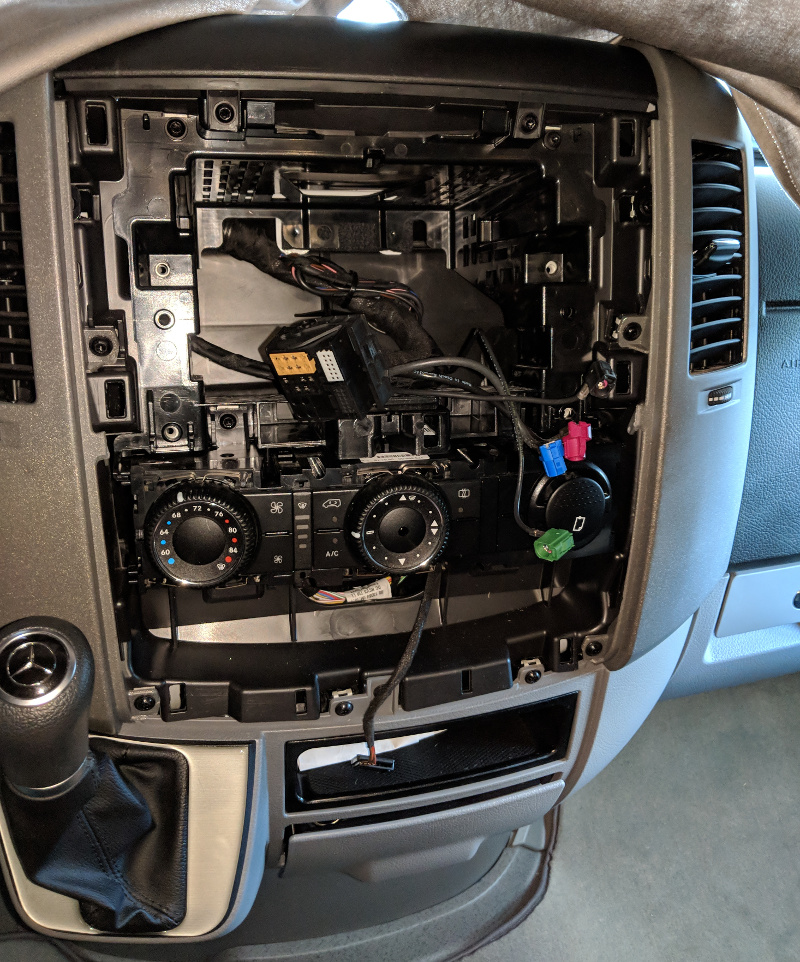
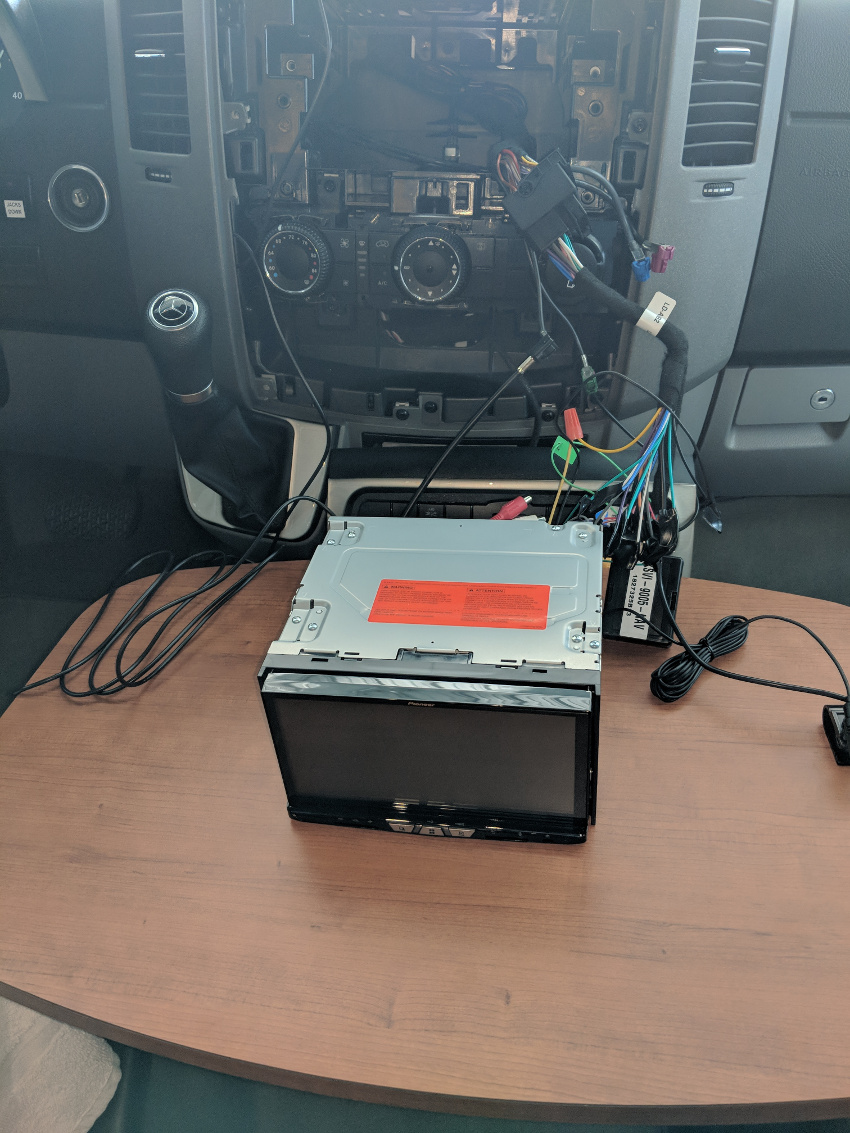
So you end up with this view of your center console! Nice. I almost wanted to just send everything back and cancel the project.
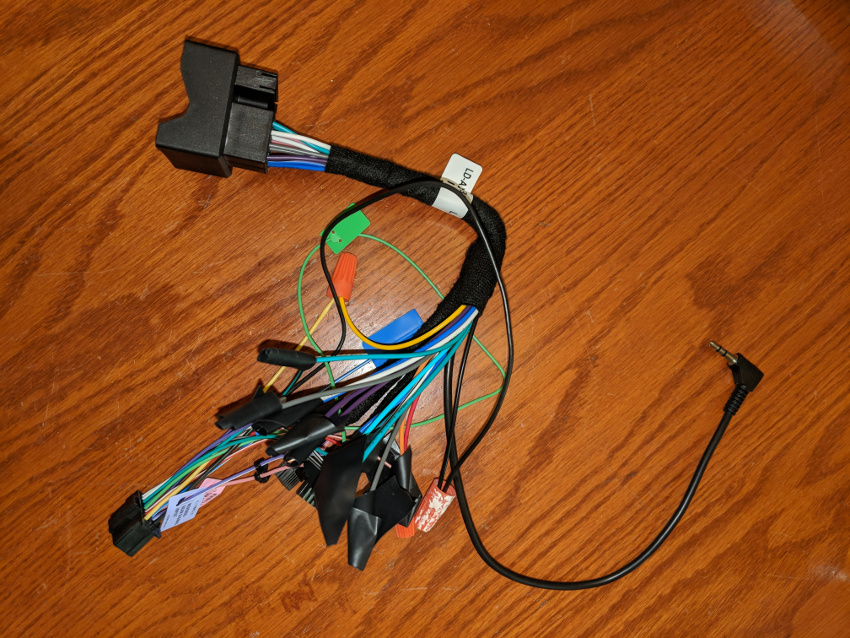
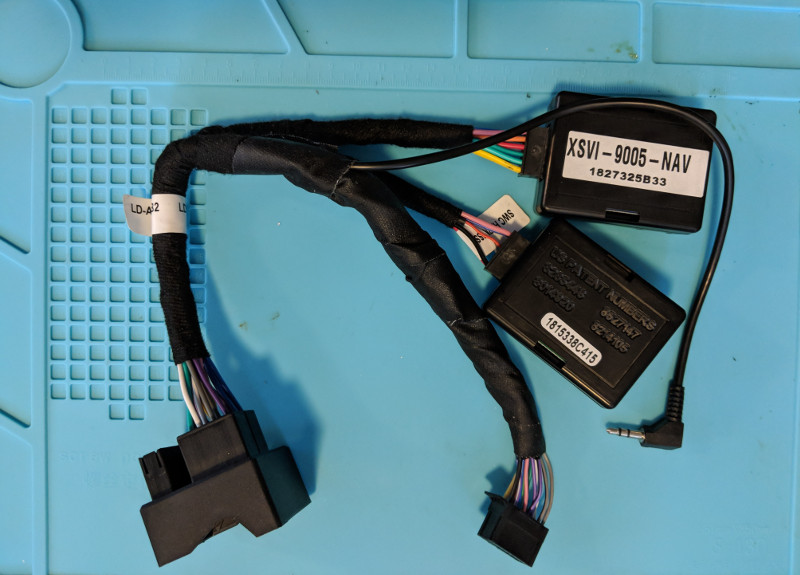
Next step, was to wire up the wiring harness that came with the Pioneer with the XSVI-9005-NAV wiring harness. This is the one that seems to work for Sprinter even though the manufacturer doesn’t specifically say it will work for 2018. So I just read the instruction manuals for each and then carefully mated up all the wires that corresponded. This is the final result:
Just kidding! That is most definitely not the final result. But I decided to twist and tape up this rats nest of wires to do a “dry run” before spending hours making up a beautiful cable.
Also, after some more research I will be using the gps antenna that comes with the pioneer, which can be installed under the dash. Likewise I’ll use the microphone that came with the Pioneer. Sprinter has a built in mic, but I’m not sure its compatible. I purchased adapters for the backup camera and radio antenna, which are also listed below.
The gps antenna – I couldn’t get a good picture – but after popping off the two side panels and the panel on top of the radio, I mounted in the pocket on the dash. So its only visible if you peer in with a flashlight. Bottom line is, you can mount it anywhere either under the dash or on top – plastic does not interfere with the reception.
Then I took the captain’s table that is an option on the Unity CB, and layed it across the front seats so I could jury rig this whole unstable mess for a test before going any further. That looked like this:
At this point I reconnected the vehicle ground. My heart was actually racing. I fully expected to turn the key to accessory and see smoke. It would have made for a great blog post!
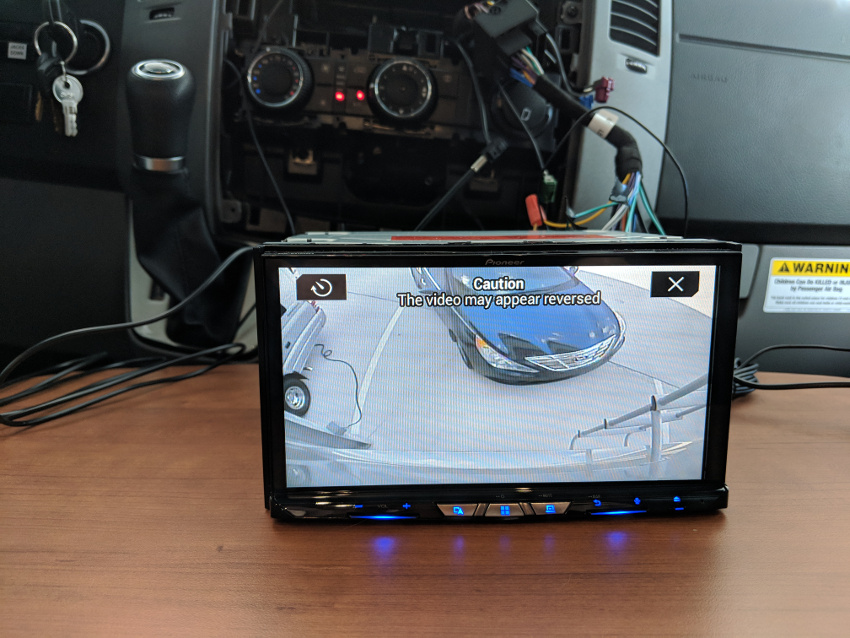
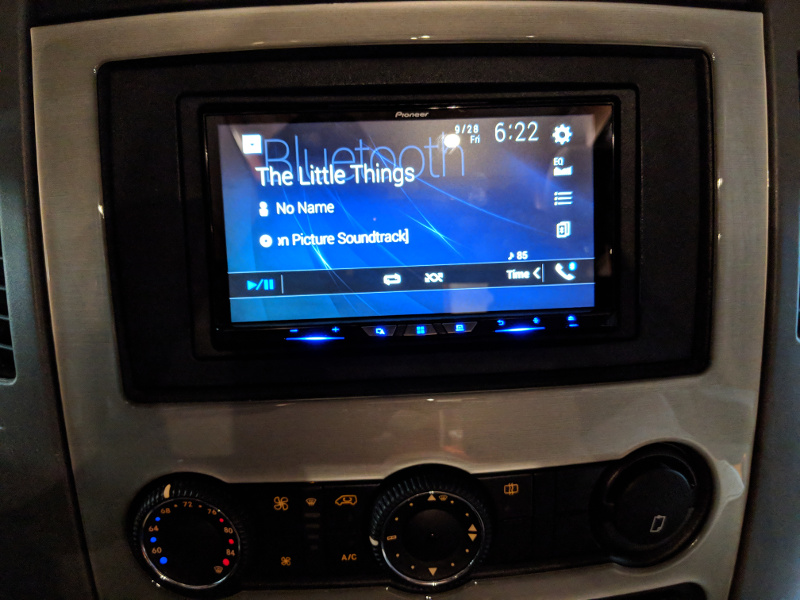
But… it worked! I tested the gps, AM/FM radio, and the backup camera. The backup camera looks much better than before and I haven’t even set it up yet (you can program in the trace lines for your path.)
(I decided to not post the gps picture as it displayed the precise location of my brand new RV, lol.)
I still have a LOT of work to do next. But I’m feeling a lot better now!
Next step is, steering wheel controls. I don’t use them a whole lot, but having at least the volume working would be nice. I purchased the ASWC-1, but was a bit confused. It came with a wiring harness, and referenced a website for instructions, which of course stated that Sprinter 2018 wasn’t supported. So I downloaded the instructions for 2015 Sprinter…
Those instructions make no sense, and the wiring harness I have actually already has the ASWC-1 connector, so I started thinking that all I had to do was plug in the module and the thing would just work.
I called Axxess tech support, and to my astonishment a friendly guy answered on the first ring… He confirmed – yes, you just plug it in – no wiring required. Just discard the wiring harness that comes with this box. Dead simple. He did however say he had no knowledge of whether this would work on a 2018.
I didn’t have high hopes for the steering wheel controls. But it actually was almost plug and play. I followed the instructions for the 2015 Sprinter and just repeatedly hit the “up” volume control on the right side of the steering wheel until the light went out and then it auto-programmed. Besides volume, the up and down channel control also works but only when the steering wheel is set on “Audio”.
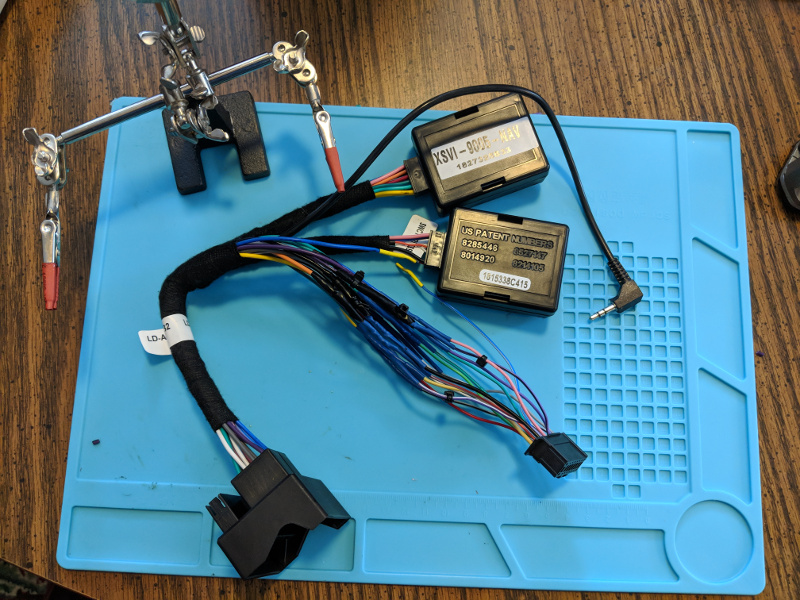
So next, I neatly soldered all the wires together. There is a reason that audio shops use splices and “butt” joints – they are very reliable, but even more importantly, fast and cheap. Soldering each wire and then covering with heat shrink tubing is slow and tedious but I can guarantee it will last 99 years.
So this is the final cable, with both the main module and the the Steering Control (ASWC-1) ready to plug and play:
Lastly, I just wrapped some friction tape over the Pioneer cable to protect everything:
Next up I mounted the Faceplate kit. I have mixed feelings about these. On the one hand its cheap and without this it would be impossible to mount the radio. On the other hand, both the first and the second one I received had factory defects, so I figure you might ordinarily need at least 3 to make a good set. At this point I just figured I could live with the minor defect and cobbled together one (almost) good one from the two on-hand.
The microphone I mounted on the visor as recommended, and concealed the cable pretty well by running down the door channel. That cable ended up being short, so I purchased a 3 feet 2.5 mm audio extension cable.
I also mounted a little dual usb cable receptacle on the bottom of the dash. As it stands I don’t think I will be using it as everything seems to work fine wirelessly.
Final result looks pretty nice:
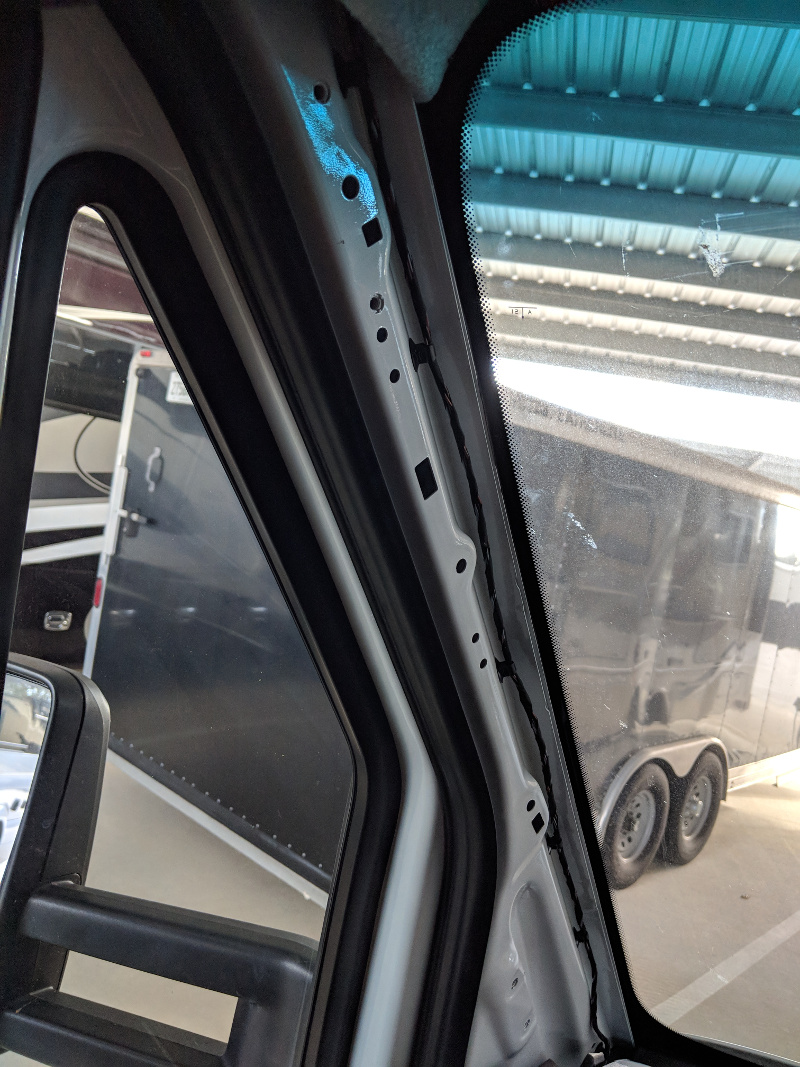
Finally I also installed the Sirius module and purchased a roof mount antenna. I ended up mounting the Sirius antenna on top of an aluminum box I mounted on the roof. This was for my “Mother of All Internet” project, but I figured if I was going to have to drill a hole in my roof I was only doing one!
Putting the Sirius antenna on the rooftop box would let me easily change either that or the internet router antenna some future time without any more drilling.
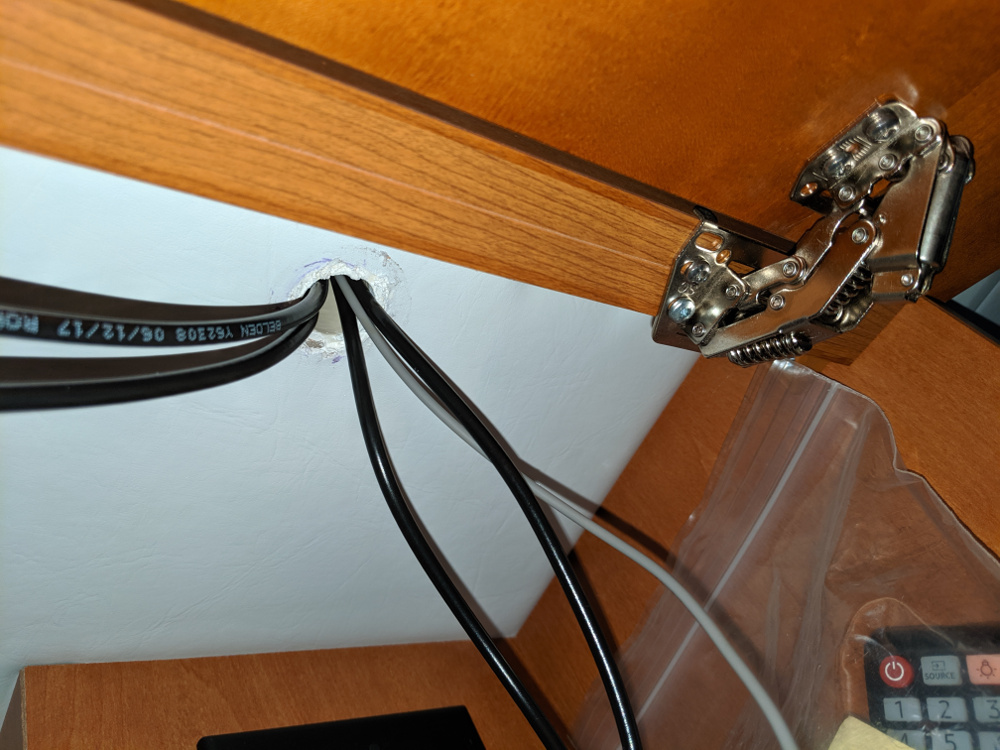
Routing the Sirius antenna cable to the roof was challenging. I had to fish the cable inside the roof header to th entertainment cabinet. I did this by pushing a borescope up through the center console cutout on the roof. Then I took off the inside panel on the rightmost cabinet next to the entertainment console.
My wife stuck her hand through the opening and around the corner into the void. For clarity this is the cabinet to the far right as you look towards the Sprinter windshield.
WIth my wife waving her hand behind this cabinet I was able to thread the borescope right to her hand and then she tied a string to it to pull the cable through. I drilled a small hole in the entertainment cabinet to pass the cable to this adjacent cabinet.
So far I am pretty happy, but in truth I haven’t actually used it yet beyond testing. There are a LOT of screens and features, and it will take some time to work through everything.
Update Oct 11 2018:This thread was posted which shows a guy who just tapped into the Sprinter mic, and yes, it does work. I was pretty interested in that. Its a bit of a pain as you have to tap into the Sprinter side of the harness. (I was not really keen about soldering in the live dash). So I used these Posi-Tap connectors which I have had good success with in the past.
The same guy (Mitch) gave me a lot of other good ideas including powering up the Sprinter Antenna (otherwise the AM/FM performance will be disappointing) and a better idea for usb ports (more on that later).
So I initially tapped the microphone and powered antenna wire here. The mic is the purple/gray pair (purple is positive) and the black wire with the white stripe is the antenna power. (For my 2018 anyway, it is purple with a white stripe on older models). See this link for identification.
Then I used the 3 wire connector you see to connect to the aftermarket harness I made, which now has a mic jack and the power antenna wire connected.
It was a great idea, but when I tested it the Sprinter mic was horrible with the Pioneer, really not usable. I put an ohmmeter on my connection and it was good but the sound quality was terrible. So I actually abandoned this effort and went back to the Pioneer mic which I mounted in the visor and which sounds decent.
Finally Mitch also recommended a much more elegant idea for the usb ports, which I followed. One of them you can connect to the drivers side upper dash hidden factory connector by using the FAKRA (pink) to USB adapter. The other (or both, if you wanted, can go right in the dash by using these custom made inserts. Search Ebay for “NCV3 Sprinter (2007 – 2018) USB Port and Dash Adapter” which snap in to one of the button knockoffs in the dash.
Both look great, but the funny thing is, after all that they don’t work for me. Turns out the Pioneer has a known bug with Pixel 2 devices which use the newer USB-C connector as used on Macbook Pro. I got an error message on inserting and a google search revealed Pioneer only works with certain cables and not these for USB-C. It works fine for my IPad and I’ll never use USB ports anyway, so I just left them as is.
July 2019 Update: Pioneer issued a firmware update which seems to have solved the USB cable issue on Pixel 3’s. It now works fine with it, albeit at a lower charge rate than “rapid”. The firmware update just requires you to unzip some files and put on a memory card or stick. After the upgrade my Pixel 3 can use the usb.
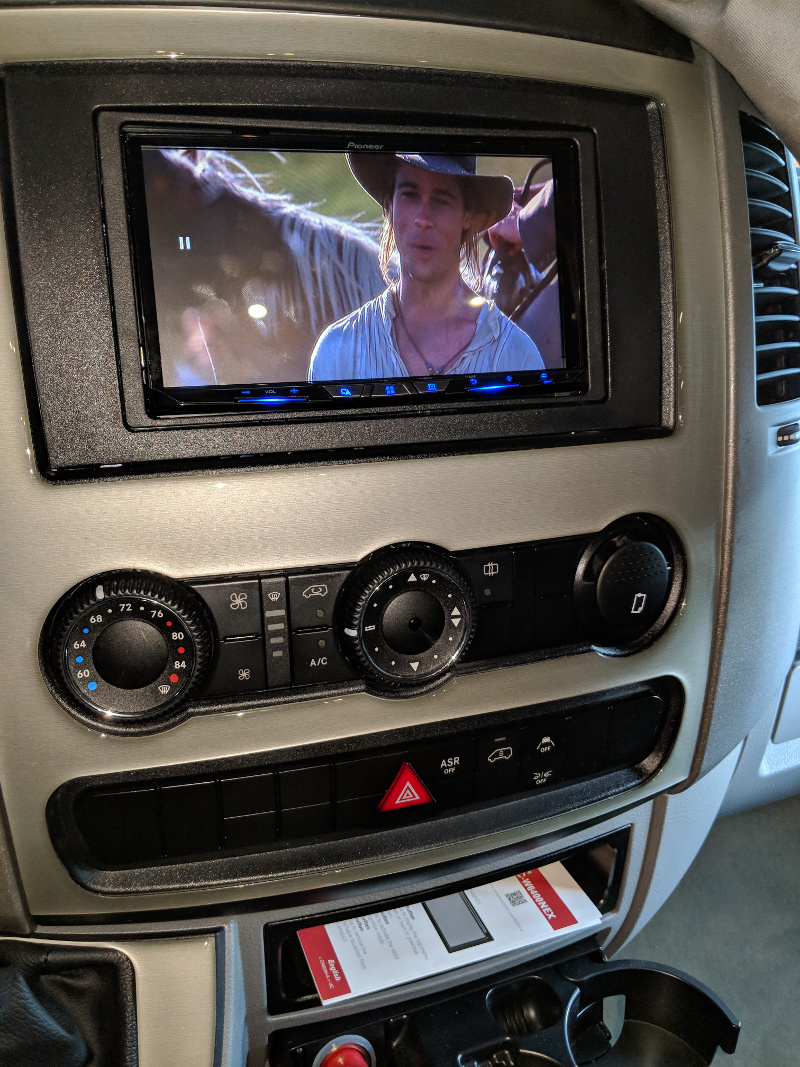
The Pioneer is also pretty cool at playing cds or dvds. In the case of the later, you have to be stationary as its obviously somewhat suicidal to play dvds for entertainment while driving. Nevertheless, I googled around and found a few youtube videos on turning off that restriction via some secret commands.
I seriously doubt we would ever play dvds in the driving cab, but couldn’t resist testing it:
Update: Oct 25 2018
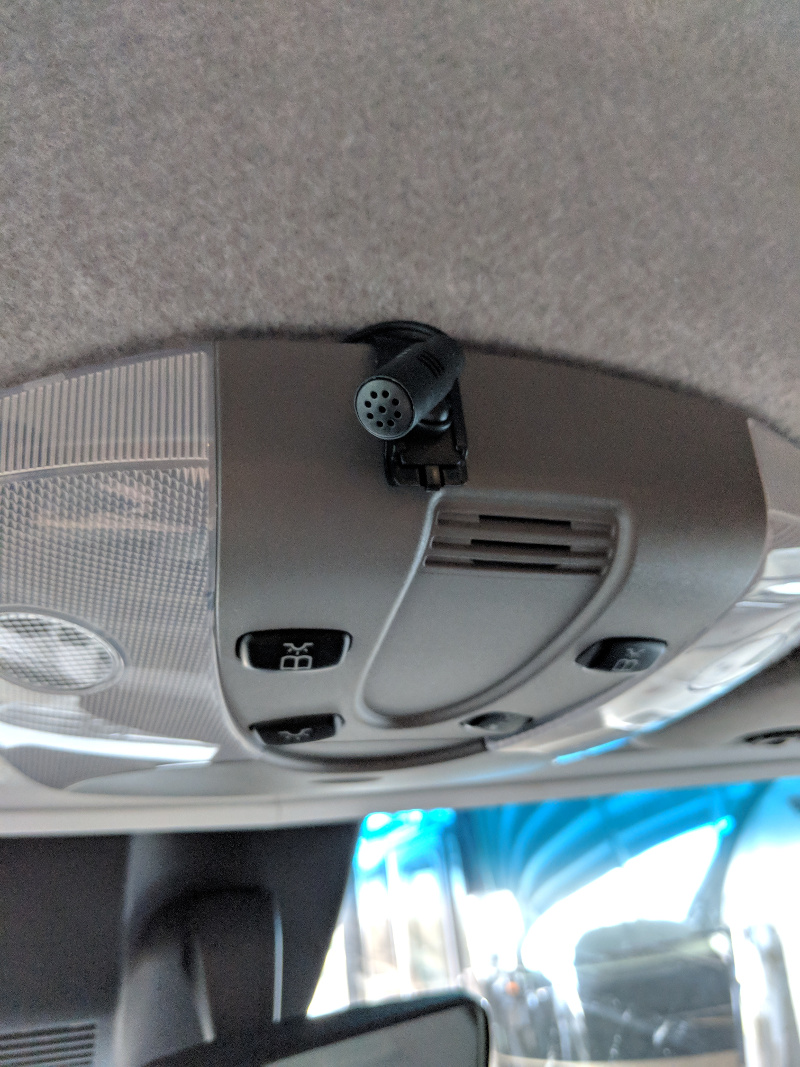
Since I only got good results using the included Pioneer mic, I went looking for a more elegant way to hang it. I had seen a post of one guy (different type of vehicle) who glued it in the overhead console replacing the factory mic and I was considering that. I don’t know why, but I thought fishing this up through the “A Pillar” and through the header would be time consuming, but it turned out to be laughably trivial. First, the “A Pillar just pops off. You pry a little from the top and it snaps out:
Next, to my surprise the little console on the ceiling also pops off – just squeeze the sides a little and wiggle:
At this point it took about 2 minutes (if that) to fish the mic wire up through the dash, tie wrap it onto the “A Pillar”, and through the header into the cutout. I ended up just deciding to snap it onto the outside of this console:
I don’t mind the slight non-oem look, and I appreciate that I can angle the mic exactly where I want it. If you are fanatical about the appearance of the mic, it could be easily concealed in where the original mic is mounted, but it didn’t seem worth the bother to me and that would put some plastic in the way. It seems to work well here.
Update June 3 2020: The Pioneer is still working great after many travels. As it was superseded by the 8500 it was a real deal on Amazon for a while for $600. Looks like the stocks have run out and sellers have raised the price so I have also included an 8500 link below.
My very first RV purchase once we finally received ours (the 2019 Leisure Travel Corner Bed was one year on order) was an air compressor. I think it’s the most essential RV accessory.
A couple reasons. First, maintaining proper air pressure is extremely important. It will have an effect on the safety, handling, and tire life obviously.
The other reason though, is that some RV’s (like mine) don’t even have a spare or any easy way to mount one. So in my case even a slow leak in the middle of nowhere could result in some pretty severe travel disruption and headaches I’d rather not experience.
So the air compressor, besides allowing me to topoff the pressure when necessary, could mean the difference between being delayed or not.
Of course, for topping off, you could use public air like at gas stations. I detest those though. More often than not, the air chuck will not fit my inner dually, or is just crappy and won’t seat right. Often you are going to have to turn around your rig to do both sides.
Another consideration is to just use one of the many “el-cheapo” 12 volt air compressors you see on Amazon. They work, but from past experience are loud as hell and take forever (like 20 minutes per tire!) to add any serious air. Some will work at my tire’s recommended PSI (61) but the drawbacks are pretty severe.
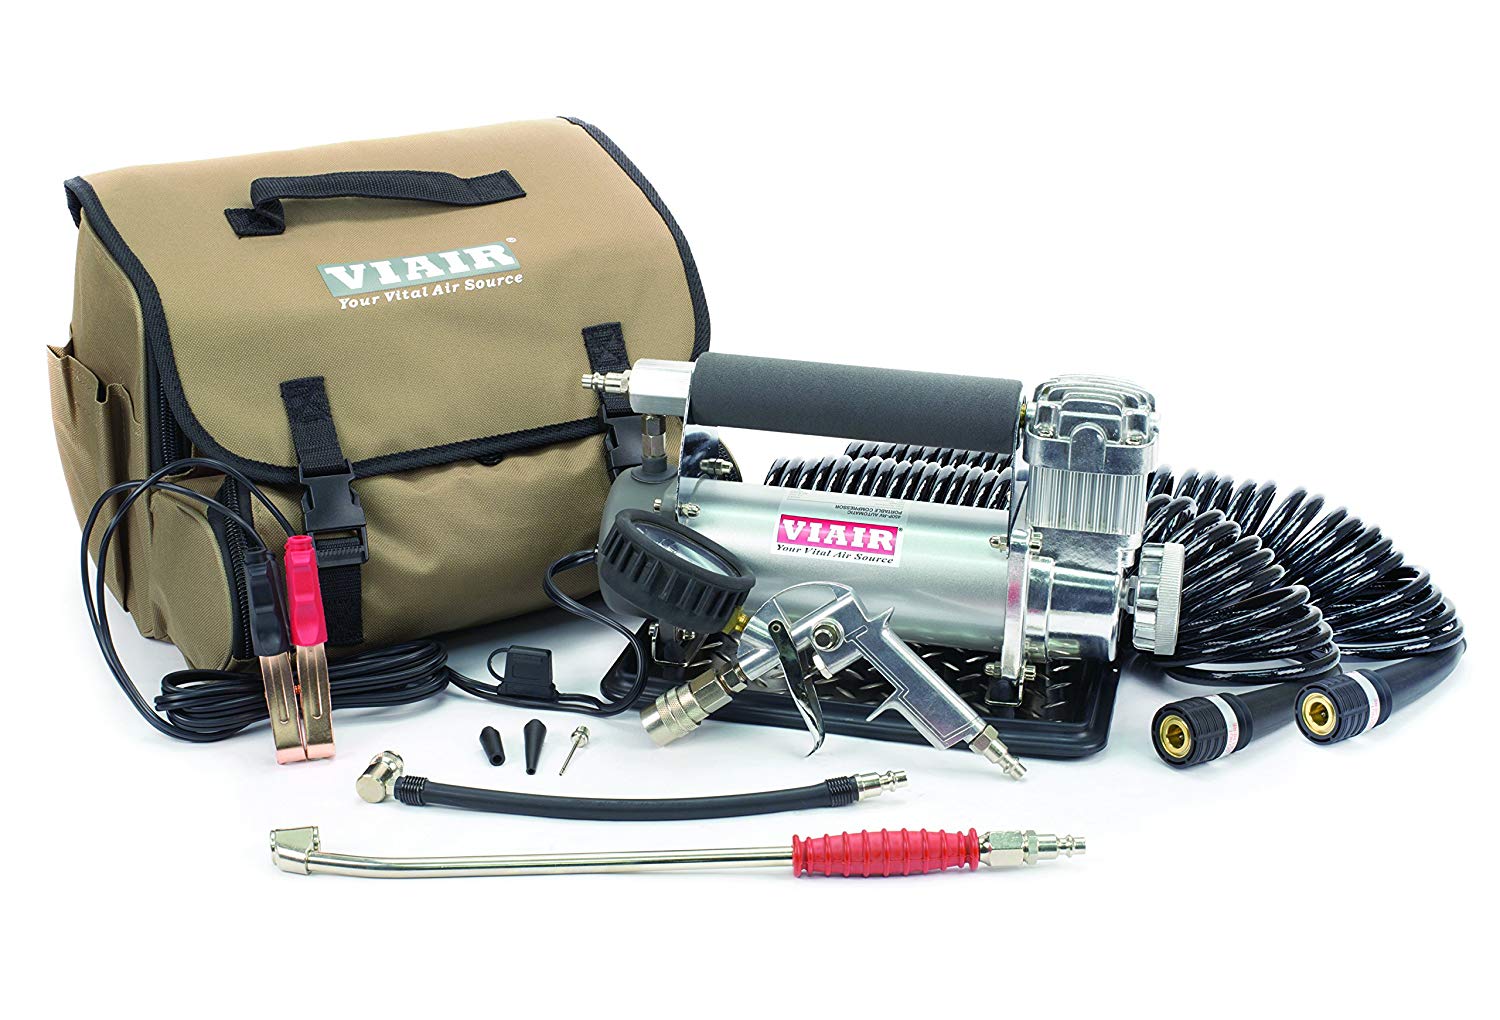
So I went off looking for a real compressor. After a lot of research here is the obvious choice (although not the one I bought!):
The is the cadillac of RV compressors according to most of the people who have owned them. They have a bunch of models, but this one is the continuous duty one that can be used to blow up truck tires literally all day and comes with all the accessories.
Now, the bad news is, you have to open the hood and clamp on for power. The kind of amps it pulls cannot be had from a cigarette lighter plug.
Although they tell you the engine has to be running, most people use them for occasional use with the engine off and it works just fine. The other bad news is, it’s REALLY expensive.
So what I actually ended up buying for my RV was this:
So, this little guy was just about the smallest “garage” style compressor I could find. It runs off regular 120 volts which has its pros and cons. For me it was a better solution. A lot of the time while using it I am going to be parked and have hookups. In an emergency I can use my generator. As a bonus since it has a small tank you can also use it to shoot a few trim nails or something from time to time. It actually only weighs a little more than the VIAIR.
WIth the Bostitch though, it doesn’t come with anything, so I still had to buy the air hose, an inline gauge, and a dually chuck which could reach all wheels. To complete the kit I popped into Home Depot and picked up a couple standard 1/4″ inch air connectors to put it all together.
This way you also end up with something useful you can keep in your garage while the RV is not being used!
Here is a recap of the products I recommend: With the VIAIR you get everything in a kit. WIth the Bostitch I ended up actually buying (love it so far) I had to put together an air hose with the inline gauge and add a dually chuck set to get a smooth one handed fill/bleed operation on all 6 wheels.
Update: Jan 10,2023 A few people asked me why I cut the pex and installed the Tee. The answer is that on my bowl the pex is so tight behind the toilet that there is not room to do anything.
If you can reach the water fitting behind your toilet, you might just be able to use the fitting that comes with the Bidet. Or this Sharkbite T fitting From Lowes. This will just thread right on to your toilet – no plumbing or cutting required!
The other reason I cut mine though is because the bidet water line would not reach to the toilet anyway.
Update: Oct 23, 2022 This was my first blog post – and still gets tons of hits – and not much has changed. One thing that has changed is that my Dometic 310 toilet finally bit the dust, so I ordered a new one off Amazon. The replacement toilet had a nicer wood soft close seat, which replaced the dinky plastic one.
However, I noticed that that the little plastic shell piece that covers the rear valves – people refer to this as “the hump” below I think – no longer accepts a bidet. For now I just reused my old plastic seat. Looking at the part, it looks like it would be pretty easy with a dremel cut off wheel to operate on the little plastic dust cover and shave off the offending plastic hump, but I haven’t tried that yet.
Update: Jan 2, 2018 Thanks Google! I didn’t think much when I posted this, but this page has been showing up in Google searches for terms like “rv bidet” and the like, actually becoming #1! Turns out a lot of people like having a clean time in the bathroom.
One question I get a lot is “how about fancier bidets with heated water and such? Well as I explained I personally don’t see the need. We camp during moderate weather, and the water temperature is fine with us. The heated ones are also a potential mold trap if you leave them on all the time. But all that said a heated one would work out just fine. Just look for one that will physically fit in your space. (The fancy ones have a remote control panel which actually works well for the tight space).
And so back to the original article –
Note this article is a few years old but not much is changing with bidet technology. Please also check out a ton of other RV upgrades at the rest of the blog.
OK so, admittedly, the concept of the bidet hasn’t really taken off in the USA. You see them now and then, but most of us are apparently content with wiping ourselves with copious amounts of Costco toilet paper and calling it a day.
Long ago we got hooked on these contraptions and have installed them in every toilet in the house. We started off with some fancy $600 version that had everything from built in heat to a butt dryer. (I kid you not). But besides being expensive, we discovered those devices were mold and mildew traps, hard to keep clean, and generally silly.
So the dirt cheap versions we use now just spray your ass (and potentially other nether parts) with whatever water is circulating in your cold water line. Most of the time the temperature of that water is going to be fine.
We just got our RV, and frankly didn’t know what to do with the toilet without the bidet on top. The so called “septic safe” toilet paper falls apart in your hands, and you can’t put a “flushable wipe” into an RV toilet. We read that some people keep a trash bag in their RV bath and toss used wipes into it, and, uh, that’s just not happening in ours.
So really for an RV the bidet is just perfect. It greatly eliminates the need for toilet paper – just a few sheets are needed for, uh, drying purposes. The amount of water used is quite small with a little practice.
This is really a very simple project if you are an amateur plumber like me. If not, you could just purchase the items and then call any RV mechanic or even a regular plumber to make the connection for you.
I’ll list the exact parts I used at the bottom of this post for reference.
First, I started with this bidet off Amazon:
Its amazingly cheap (less that $35 as of 2018) and I already owned a few. As you can see all you do is remove the seat and fasten underneath. Well, almost. The RV toilet typically doesn’t have home plumbing, so I had to improvise a little. My RV (probably like yours) has a 1/2″ pex line that goes directly to the toilet. After staring at it a while I decided the simplest approach would be to cut the pex line and install a tee for the bidet.
As you can see I selected a tee with a 1/2″ male thread which will fit the braided hose supplied with the bidet. The key is, after the first cut, insert the brass tee and make a precise mark on where to make your second cut. Pex is very stiff, so if you are off – even a little – it won’t fit. A millimeter too long is good – you can bow the pex a tiny bit – but if you are too short you are going to have a bigger job.
If I was smart, I would have made the cut, then bowed the pex enough to get the other side on the tee, and probably finished in a few minutes. But I decided to remove the toilet side of the pex, which for reference, looks like this:
That probably wasn’t necessary, and its a bit hard to put back on. Even with some liquid pipe joint compound – the kind that never hardens – and being very careful not to cross thread – that black plastic swivel connector seemed kind of cheap and hard to reattach. I had to tighten it a lot more than I expected to get it to stop dribbling. But it did make the tee connection a bit easier, and the final result looks like this:
A couple things. First, since the length has to be so precise, if you do disconnect the toilet reattach before making your crimp. That way you can be sure the length is correct. Also, I added this perfect little shutoff valve before I threaded the braided hose on – which came with the bidet. It serves both a useful purpose in case the bidet springs a leak, but also you can shut it off if a toddler is around. I liked the shutoff so much I put a second one on the shower head – as the one supplied with LTV dribbled even when off.
The bathroom is so tiny that I was just barely able to get the pinch crimps on. The hardest part of this job by far was figuring out how to work in such a small space and then grunting and sweating trying to reach the pex and make perfect cuts and crimps.
So this pretty simple project resulted in the bidet working perfectly. It just fits the toilet as you can see in the first picture. The supplied braided hose just barely reached but presses against the wall a bit. I may look around for a 3/8″ compression elbow to alleviate that.
Here is a list of the products I used available at Amazon, except for the brass tee which I had to order from Home Depot.
Note: If you have never crimped a pex connection before its easy! I’ve also linked an inexpensive kit for pex.
So that’s it. My first RV upgrade. We are looking forward to trying out the bidet on our next trip (but will not be posting any pictures of it in use).